Creating the Box Effect with Recordset Navigation Suite
The Recordset Navigation Suite sample file has one set of links in it that I get questions about all the time, showing the recordset navigation as little boxes that change color when you hover over them:
This tutorial will show how to create the effect of the boxes using some simple CSS. First, decide whether you want to use an external stylesheet, or include the CSS in the head. For this simple demo, the CSS will be in the head (you can view source to see it, also):
<style>
/* Styles defined here */
</style>
The navigation links are generated dynamically by the code from the extension, but the code itself is very simple:
<p class="boxes">
<a href="/">1</a> <a href="/">2</a> <a href="/">3</a> <a href="/">4</a> <a href="/">5</a> <span class="current">6</span> <a href="/">7</a> <a href="/">8</a> <a href="/">9</a> <a href="/">10 </a>
</p>
The set of links is contained in a paragraph tag with a class name of "boxes". The href attribute would contain the page name, which is generated automatically by the server behavior. The boxes class looks like this, and is put into the <style> tags in the head:
.boxes {
font-family: Verdana, Arial, Helvetica, sans-serif;
font-size: 12px;
margin:0;padding:0;
}
.boxes a:link, .boxes a:visited, .boxes a:active{
color:black;
background-color: #FFFFFF;
border: 1px solid #FF0000;
margin: 1px;
text-decoration: none;
padding: 1px 5px;
}
.boxes a:hover {
color:white;
background: #000000;
border: 1px solid #FF0000;
margin: 1px;
text-decoration: none;
padding: 1px 5px;
}
The link, visited, hover, and active links are each defined with a border around them and padding to make it look like a small box, with text-decoration set up as "none" to remove the underlines from the links. The hover link is set up with a black background and white lettering.
The current page would not be a link -- you are currently on this page, so you don't need a link to it. What you do need, however, is a different class to separate the design from the other links. I created a class called "current" and put it in the head:
.current {
background-color: #FF0000;
border: 1px solid #FF0000;
color: #FFFFFF;
font-weight: bold;
margin: 1px;
padding: 1px 5px;
}
I gave the background color and border the same color (red), made the text white and bold, and set some padding around it to give it the box shape.
To create the links, after the styles are defined, follow these steps:
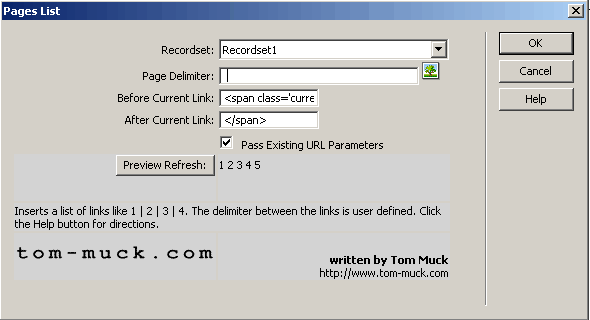
- Choose Server Behaviors > Tom-Muck.com > Recordset Navigation > Pages List.
- Choose the recordset you want to page through.
- Type a space into the Delimiter box.
- In the Before Current Link box, type the following:
<span class="current"> - In the After Current Link box, close the span tag:
</span> - Apply the behavior.

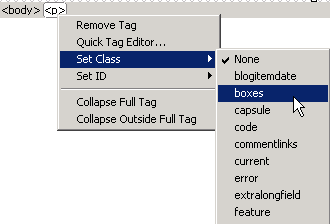
Next, you'll need to add the .boxes class to the entire tag that the Pages List extension is inside -- most likely a <p> tag:

After setting the CSS, the links should now be styled. The same concepts can be applied to other styles of links.
Tom Muck, 9/2005
More info on the Recordset Navigation Suite here.
Watch the 3-part movie series on applying the Recordset Navigation Suite and other extensions.


 Blog RSS feed


