


 Blog RSS feed


Previous X Pages and Next X Pages
These two server behaviors should be used in conjunction with the Pages List Limited and Links List Limited server behaviors. Those two behaviors allow you to limit the number of recordset navigation links that are displayed on your page. The Previous X Pages and Next X Pages behaviors allow the user to skip ahead or back a specified number of pages. The links can look something like this:
[Previous 10] <<
34 35 36 37 38 >>
[Next 10] >> [Next 100]
of 387 Pages
Or like this:
Previous 10 ... 101-110 ~ 111-120 ~ 121-130 ... Next 10 of 387 Pages
The interface for the server behaviors allow you to choose the text or special characters that you want shown in the links.
Previous X Pages
1. Add your recordset to the page if you haven't done so already.
2. Add your database columns to the page and apply a repeat region to them choosing the number of records that you want displayed on each page.
3. Pick a spot on the page where you want Previous X Pages to appear and select it from the Server Behaviors >> DWTeam >> Recordset Navigation menu.
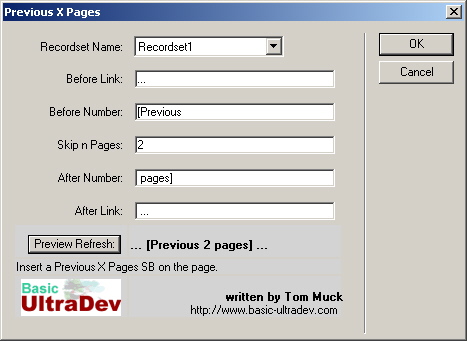
4. Choose the correct recordset from the dropdown box.
5. Choose the text, characters, or.cfml that you want to go before the link. You can click the Preview Refresh button at any time to see what the link is going to look like.
6. Choose the text that you want to be in the link itself, but before the number that is shown. In this example, there are 3 dots before the link, and the word "[Previous" is in the link itself.
7. Next, the number of pages that are going to be skipped should be placed in the Skip n Pages box. This number also appears in the link.
8. The After Number box should contain text that is in the link, but after the number.
9. Finally, the After Link box contains text that is shown after the link.
10. If any changes need to be made, make the changes and then click the Preview Refresh button once again to see what the link will look like.
11. Click the OK button.
Next X Pages
1. Add your recordset to the page if you haven't done so already.
2. Add your database columns to the page and apply a repeat region to them choosing the number of records that you want displayed on each page.
3. Pick a spot on the page where you want Links List LImited to appear and select Links List Limited from the Server Behaviors >> DWTeam >> Recordset Navigation menu.
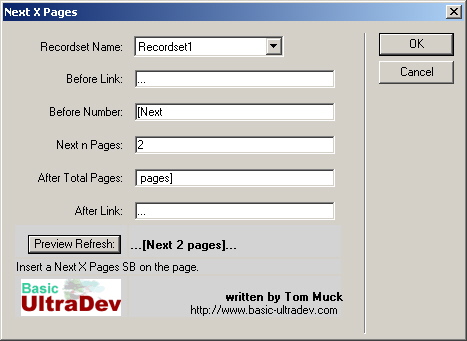
4. Choose the correct recordset from the dropdown box.
5. Choose the text, characters, or.cfml that you want to go before the link. You can click the Preview Refresh button at any time to see what the link is going to look like.
6. Choose the text that you want to be in the link itself, but before the number that is shown. In this example, there are 3 dots before the link, and the word "[Next" is in the link itself.
7. Next, the number of pages that are going to be skipped should be placed in the Next n Pages box. This number also appears in the link.
8. The After Total Pages box should contain text that is in the link, but after the number.
9. Finally, the After Link box contains text that is shown after the link.
10. If any changes need to be made, make the changes and then click the Preview Refresh button once again to see what the link will look like.
11. Click the OK button.
