 Blog RSS feed


Tom Muck's Blog
News and Views
3 posts
in February - 2011
Showing 1
| Previous
| Next
(page 2 of 3)
Deployment Process in ColdFusion Builder
Monday, February 14, 2011 6:00:00 AM
I decided to start using ColdFusion builder alongside Dreamweaver for my development. At work, we use Eclipse exclusively, but it is severely limited, and much of it doesn't work right (code hints...what the heck is hamcrestassert and why does it get inserted when I move to the next line???). I'm much more comfortable coding in Dreamweaver -- especially since the enhancements of CS4 and CS5 -- but have started liking the Ant build process and the Subversion integration of Eclipse/ColdFusion Builder. So I decided to start setting up projects in both.
My work environment is a lot different from the typical development workflow that I am accustomed to, so I wanted to set up an Ant build script for my local use on my laptop, and a remote FTP development server. ColdFusion Builder has most of what is needed, with the exception of a couple of Java classes for the FTP functionality (commons-net-*.jar and jakarta-oro-*.jar). Download these and add to the ColdFusion Builder (or Eclipse) plugins /lib folder for Ant, located here typically: C:\Program Files\Adobe\Adobe ColdFusion Builder\plugins\org.apache.ant_1.7.1.v20090120-1145\lib
I haven't found a lot of useful information for the ColdFusion developer on setting up Ant build scripts, so hopefully this will help someone. Basically, a build script is XML that contains a project tag and one or more target tags under it. You can also set up a property file that contains details about your project. This makes it easier to set up a generic build script that can be reused. Simply change the properties in the property file.
I'm going to assume that the project will have all the files to be deployed at the root of the project. This is not always the case, and indeed not usually the case, but changing paths is easy enough in the script. I'll add a build folder to the root of the project, and add the build.properties and build.xml files to this directory.
My build.properties file looks like this:
#deploy to LOCAL server
deploy.dir.local=c:/inetpub/wwwroot/mysite
#deploy to DEV server
deploy.dev.ftp.host=myftpsite.com
deploy.dev.ftp.username=myusername
deploy.dev.ftp.password=mypassword
deploy.dev.ftp.basedir=/
#deploy to LIVE server
deploy.live.ftp.host=myliveftpsite.com
deploy.live.ftp.username=myusername
deploy.live.ftp.password=mypassword
deploy.live.ftp.basedir=/
It contains information on the local directory where I do local testing, the FTP site where the development server resides, and the live server where the final deployment will happen. My build.xml file looks like this:
<project name="My Project" basedir="../." default="deploy.local">
<!-- Load properties -->
<property file="build/build.properties"/>
<target name="deploy.local" description="Deploy to local webserver">
<echo>Copying files to local webserver...</echo>
<mkdir dir="${deploy.dir.local}"/>
<copy todir="${deploy.dir.local}">
<fileset dir=".">
<include name="**/*" />
<exclude name="build/*" />
</fileset>
</copy>
</target>
<target name="deploy.dev" description="Release to remote dev webserver">
<echo>Copying files to dev FTP server ${deploy.dev.ftp.host}...</echo>
<ftp server="${deploy.dev.ftp.host}"
remotedir="${deploy.dev.ftp.basedir}"
userid="${deploy.dev.ftp.username}"
password="${deploy.dev.ftp.password}"
depends="yes">
<fileset dir=".">
<include name="**/*" />
<exclude name="build/*" />
</fileset>
</ftp>
</target>
<target name="deploy.live" description="Release to remote webserver">
<echo>Copying files to live FTP server ${deploy.live.ftp.host}...</echo>
<ftp server="${deploy.live.ftp.host}"
remotedir="${deploy.live.ftp.basedir}"
userid="${deploy.live.ftp.username}"
password="${deploy.live.ftp.password}"
depends="yes">
<fileset dir=".">
<include name="**/*" />
<exclude name="build/*" />
</fileset>
</ftp>
</target>
</project>
A couple of explanations: the fileset tag includes the directory outside of the build directory (project root in this case), and the exclude tag excludes the build directory from the build process. You don't want these in your deployment directories. The depends attribute in the FTP tag allow you to exclude unchanged files from the FTP process, otherwise the build will FTP the entire project each time.
With these files in place, you can right-click on the build.xml file in the project and click Run As > Ant Build.... This brings up the Run dialog (clicking the option without the elipsis runs the build using the last known configuration).
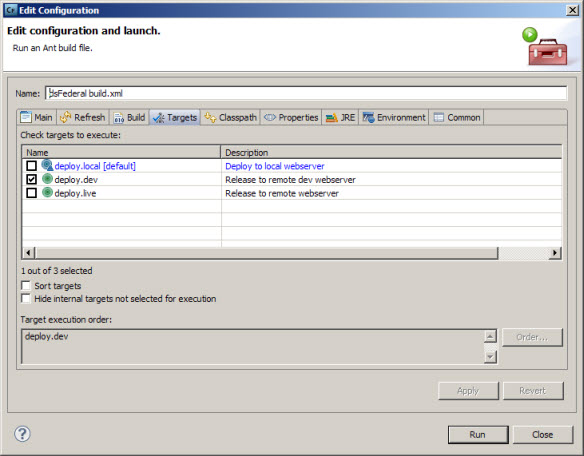
Here, you can simply check the deployment options you want to use. If you are doing only local testing, check only the deploy.local box. If you want only the dev server, check that box. You can also check any combination. Next time, you can click Run As > Ant Build without the elipsis and it will just run using the last configuration. For example, if doing only local testing, check that box, so every time you hit the Run button, only local files will be deployed. The process is fast. Only changed files are deployed.
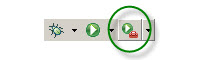
Run button
When you run the build, the Console window will show the results of building
Buildfile: C:\Documents and Settings\tmuck\Adobe ColdFusion Builder workspace\myproject\build\build.xml
deploy.local:
[echo] Copying files to local webserver...
[copy] Copying 1 file to c:\inetpub\wwwroot\myproject
BUILD SUCCESSFUL
Total time: 407 milliseconds
I hope that helps someone.
Category tags: Dreamweaver, ColdFusion, ColdFusion Builder/Eclipse
Posted by Tom Muck
Add comment |
View comments (1) |
Permalink
|
Trackbacks (0)
|
![]() Digg This
Digg This
3 posts
in February - 2011
Showing 1
| Previous
| Next
(page 2 of 3)
Before posting comments or trackbacks, please read the posting policy.
