![]()
Insert Record and Retrieve Autonumber for MS Access and SQL Server
|
Before using this server behavior, you should be familiar with basic database inserts using the Dreamweaver MX Insert server behavior, as these two server behaviors work in the same way. Information can be found in:
Following is a short excerpt from that section: |
Building the insert page block by block
You can add the basic building blocks of an insert page separately using the form tools and the Server Behaviors panel.
You can also add the building blocks all at once using the Record Insertion Form live object. For more information, see Building the insert page in one operation.
The first step is to add an HTML form to the page to let users enter data.
To add an HTML form to an insert page:
| 1 | Create a new page (File > New) and lay out your page using Dreamweaver's design tools. |
| 2 | Add an HTML form by placing the insertion point where you want the form to appear and choosing Form from the Insert menu. |
| An empty form is created on the page. You may have to turn on Invisible Elements (View > Visual Aids > Invisible Elements) to see the form's boundaries, which are represented by thin red lines. | |
| 3 | Name the HTML form by clicking the <form> tag at
the bottom of the Document window to select the form, opening the Property
inspector (Window > Properties), and entering a name in the Form Name
box. |
You don't have to specify an action or method attribute
for the form to tell it where and how to send the record data when the
user clicks the Submit button. The Insert Record server behavior sets
these attributes for you. |
|
| 4 | Add a form object (Insert > Form Objects) for each column in the database table you want to insert records into. |
| The form objects are for data entry. Text fields are common for this purpose, but you can also use list/menus, checkboxes, and radio buttons. | |
| For more information on form objects, see"Creating Forms," in the Using Dreamweaver guide or in Dreamweaver Help (Help > Using Dreamweaver). | |
| 5 | Add a Submit button to the form (Insert > Form Objects > Button). |
| 6 | If you wish, change the label of the Submit button by selecting the button, opening the Property inspector (Window > Properties), and entering a new value in the Label box. |
For example, here's the Property inspector of a button
labeled "Insert Record":  |
|
The next step is to add the Insert-Retrieve ID Server Behavior to insert records in a database table and retrieve your ID column (or any other column for that matter!).
Adding the Insert Record and Retrieve ID Extension for Access:
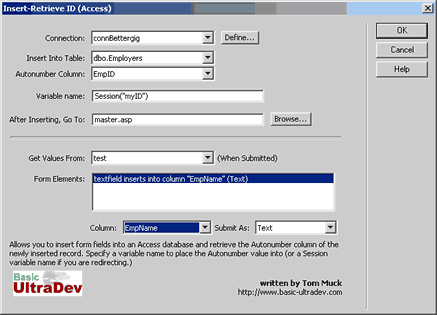
| 1 | In the Server Behaviors panel (Window >> Server Behaviors), click the Plus (+) button and choose Insert-Retrieve ID (Access) from Server Behaviors >> Basic-UltraDev from the pop-up menu. The Insert-Retrieve ID (Access) dialog box appears. |
 |
|
| 2 | Use the Connection and Insert Into Table pop-up menus to specify the database table into which the record should be inserted. |
| 3 | The Autonumber Column field is a dropdown list of all columns in the table. You should choose the column you want to retrieve. Note: You can retrieve any column you want, but the most valuable use of the behavior is to retrieve an Autonumber column. |
| 4 | The Variable Name field allows you to specify your own variable name in which to store the newly retrieved ID. If you are redirecting, you should name a Session variable, like Session("MyID"). |
| 5 | In the After Inserting, Go To box, enter the page to open after the record is inserted into the table. This field is optional. |
| 6 | In the Get Values From pop-up menu, choose the HTML form used to enter the data.UltraDev will automatically choose the first form on your page. |
| Specify what each object on your form will update in the database table by selecting a form object in the Form Elements list, then choosing a table column from the Column pop-up menu and data type from the Submit As pop-up menu. | |
| 7 | The data type is the kind of data the column in your database table is expecting (text, numeric, Boolean checkbox values). For example, if the column in the table accepts only numeric values, choose Numeric from the Submit As pop-up menu. |
| 8 | Repeat the procedure for each form object in the Form Elements list. |
| 9 | Click OK. |
This Server Behavior works in the following server models:
- ASP VBscript
- ASP JavaScript
Adding the Insert Record and Retrieve Identity Extension for SQL Server:
In the past I have not offered the SQL Server version because I believe that it is better to put the functionality into stored procedures. If you are uncomfortable creating stored procedures, you can use this server behavior which works like the standard Dreamweaver Insert server behavior. The server behavior will create an insert statement and retrieve the automatically-created @@identity variable from SQL Server.
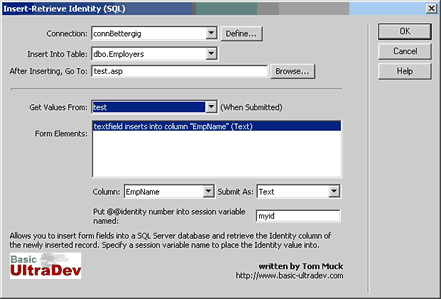
| 1 | In the Server Behaviors panel (Window >> Server Behaviors), click the Plus (+) button and choose Insert-Retrieve Identity (SQL) from Server Behaviors >> Basic-UltraDev from the pop-up menu. The Insert-Retrieve Identity dialog box appears. |
 |
|
| 2 | Use the Connection and Insert Into Table pop-up menus to specify the database table into which the record should be inserted. |
| 3 | In the After Inserting, Go To box, enter the page to open after the record is inserted into the table. This field is optional. |
| 4 | In the Get Values From pop-up menu, choose the HTML form used to enter the data. Dreamweaver will automatically choose the first form on your page. |
| Specify what each object on your form will update in the database table by selecting a form object in the Form Elements list, then choosing a table column from the Column pop-up menu and data type from the Submit As pop-up menu. | |
| 5 | The data type is the kind of data the column in your database table is expecting (text, numeric, Boolean checkbox values). For example, if the column in the table accepts only numeric values, choose Numeric from the Submit As pop-up menu. |
| 6 | Repeat the procedure for each form object in the Form Elements list. |
| 7 | Name your session variable that the Identity value will be stored in |
| 8 | Click OK. |
This Server Behavior works in the following server models:
- ASP VBscript only
Check out the FAQs.
 Buy
Now for $12 US -- get both Access and SQL Server versions for Dreamweaver
MX.
UltraDev version available here (free)
for Access only.
Tom Muck
tommuck@basic-drumbeat.com
Tom Muck
www.dwteam.com
Copyright © 2002, DWTeam.com. All Rights Reserved.